The first step was to carve the mold, and the first step of that was to get the shape and depth right. This was the mold before I'd added the design.

Looks kind of alienesque at this point (like a satellite-picture crop circle kinda thing). This is the first time I've used a sprue - that funnel-shaped thing (appropriate, since that's what it is) at the bottom of the mold. That's the 'correct' way to do it. In the past we just carved the mold, poured the pewter in, and slapped a handy piece of marble on top. That was a hit-or-miss method, as if you got just the right amount of pewter in the mold it was fine; and if you didn't, it would squirt out between the two pieces, making a useable piece but one that needed lots of trimming.
With a sprue, you use a 'backing' piece for the mold - basically two pieces of soapstone clamped together - and you use the sprue as a funnel to pour the pewter in. Like this ...
Then it only fills the mold, and the extra comes back up the sprue, instead of squirting out around the edges ... like this ...
Well, more or less ... I didn't have the molds clamped together tightly enough, so I did have a bit of leakage, but nothing like when you don't use a sprue. It's not really gold-colored, either - that's just the way the lighting was making it look.
An interesting change that I made was, usually the sprue is carved into both halves of the mold, to make basically an oval shaped funnel. But I was experimenting, and only carved the sprue into this half, not the backing half - but it seemed to work fine, so I didn't bother to carve the second piece of soapstone. That way, it's still a pristine piece of soapstone that I can use for future molds.
The seond new thing was, I'd never made a piece with the loop at the top for a string. Robin wanted the bardic medallions made that way, but I didn't think I could do it, so instead I just left an empty space at the top, and drilled a hole in them.
But the event medallions I was using as a model all had the string-loop at the top, so I thought I ought to try to do it 'right.' It was tricky.
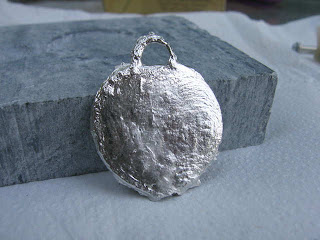
So first I did a test cast before adding the actual design, just to check my shape and depth (and the string loop at the top). It turned out pretty great.
I made a few minor modifications, and was ready to start on the design. Unfortunately I had issues with that part, but that's always the hardest part. For one thing, despite that I did this last time, and reminded myself all morning not to do it again ... yeah, initially I forgot to carve the design backwards. Which meant I had to buff out half the design that was done wrong, deepening the mold. Fortunately, it didn't deepen it too much, and my medallions were still good, not too thick.
At Pennsic we bought a little pewter casting kit, because it had a bunch of stuff we thought would come in really handy (and it did!). One of those things was 5.5 lbs of pewter in an iron pot. Easily enough, you can just set it on a stove burner and melt it. And handily enough, there's a stove up in the Imaginarium!
Although it did take almost half an hour on high to melt the pewter, but still ... far, far easier than trying to do this in the fireplace with a propane torch. (sounds like a game of Clue).
Here's the medallion in the mold, after it's opened and before it's popped out.
Some medallions laying around before their sprues were broken off.
After breaking off the sprue, I used my Dremel tool to smooth the edges, and they were done.
So I carved the mold, cast and finished 60 medallions all in one day - nothing like waiting till the last minute (the event's next weekend), but it goes to show casting doesn't take an enormously long time. I did have help, as Robin helped me with the casting for awhile, before he went off to work on his own projects.
The chest of finished medallions.
And a close-up of one.
I would like to say this isn't my best work, but unfortunately it probably is - seeing as how this is only the second thing I've ever cast, and the first one left a bit to be desired. I kind of messed up the "I" of the "IX" and my "S"s are crooked (though yes, they are supposed to be straight and spiky like runes, not curvy like normal S's). Well, it's a learning curve (S pun not intended) - rather, carving the mold is. The actual casting isn't that difficult, but carving the mold is everything because once you're done with that, that's what you're stuck with - and to me, that's tricky. But all in all I'm pretty happy with them, and the event autocrat said they were good, so as long as they're legible and serve their purpose for the event, that's what counts.
No comments:
Post a Comment